2. Configuration
Menu
The ‘Configuration’ menu in Odoo
18 Recruitment offers a wide
range of options that help
users manage essential
elements of the recruitment
process. This includes
general Settings, Employment
Types, Degrees, refusal
reasons, Other Refusal
Reasons, Tags, Departments,
Skill Types, Contract
Templates, Activity Types,
Activity Plans, Emails, and
Interviews. Below is a
comprehensive breakdown of
all the configuration
features available in this
menu.
2.1 Settings
The Settings section under the Configuration menu consists of three primary areas: Job
Posting Process and In-App Purchases, as depicted in the screenshot below.
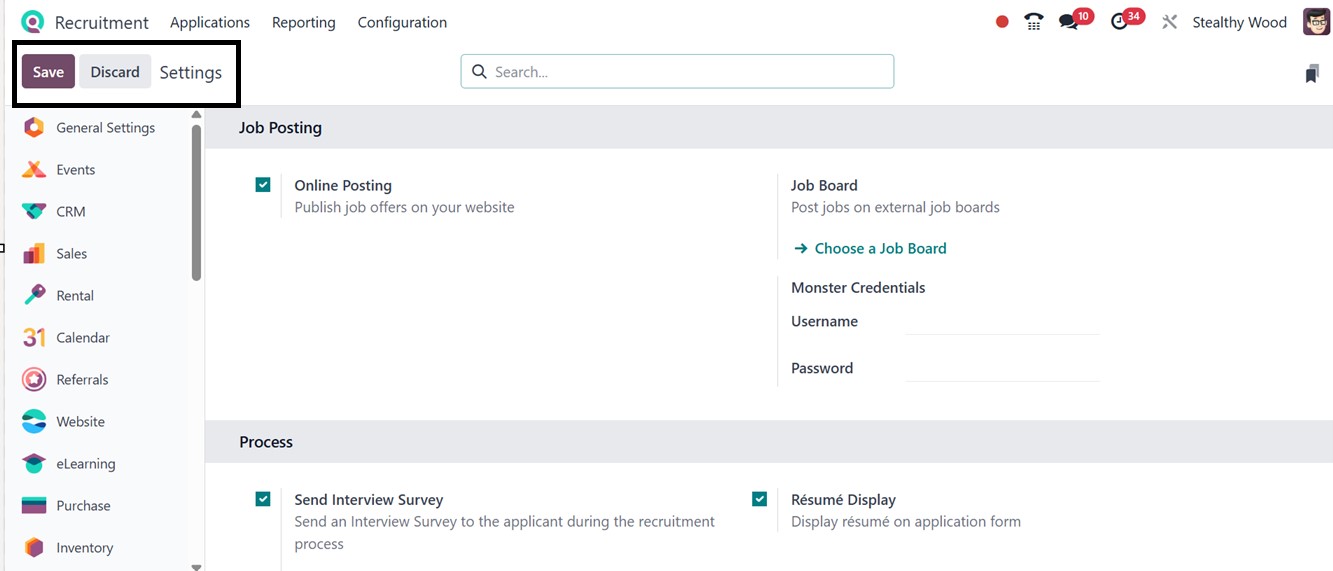
The Job Posting section includes an option to activate Online Posting, enabling users to
publish job vacancies directly on the company’s website. This simplifies the process of
making job listings publicly available and encourages direct applications through the
online portal.
The Job Board options help to manage various job portals or external job boards such as
Monster, LinkedIn, Indeed, etc.
The Process section offers automation tools like the Send Interview Survey, which
streamlines the process of sending interview forms to applicants. This feature helps
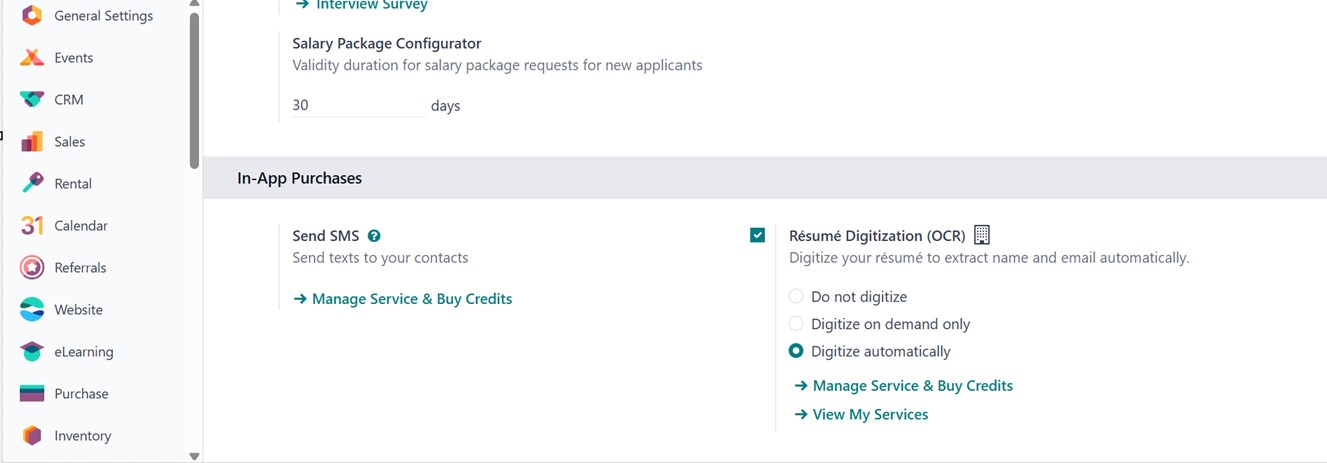
standardize feedback collection and improve overall recruitment efficiency. The ‘Salary
Package Configurator’ option helps to set a validity duration for salary package
requests for new applicants.
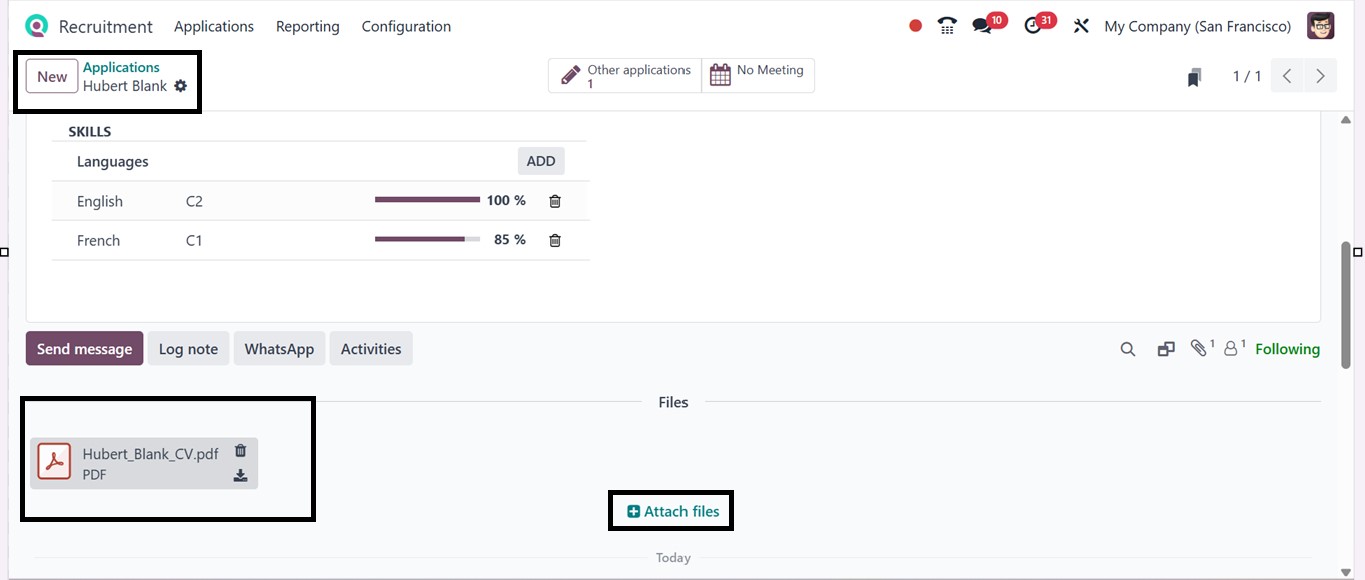
Another useful tool is the Resume Display feature, which allows recruiters to view
applicant resumes directly within the application form. Once an application is
submitted, the resume appears in the chatter section, providing quick access to a
candidate’s profile. This single-click CV preview enhances decision-making by offering
immediate visibility into qualifications and experience.
Lastly, the In-App Purchases section includes the option to enable the Send SMS feature.
This allows recruiters to send text messages to applicants, facilitating timely updates
and improving communication throughout the hiring process.
The ‘Resume Digitization (OCR)’ option helps to digitize the employee resumes to extract
the employee names and emails automatically using the OCR technology from uploaded
resumes, scanning PDF or image-based resumes and filling in key fields like name,
contact information, education, and experience, enhancing data entry accuracy and saving
time, especially for managing high application volumes.
2.2 Employment Types
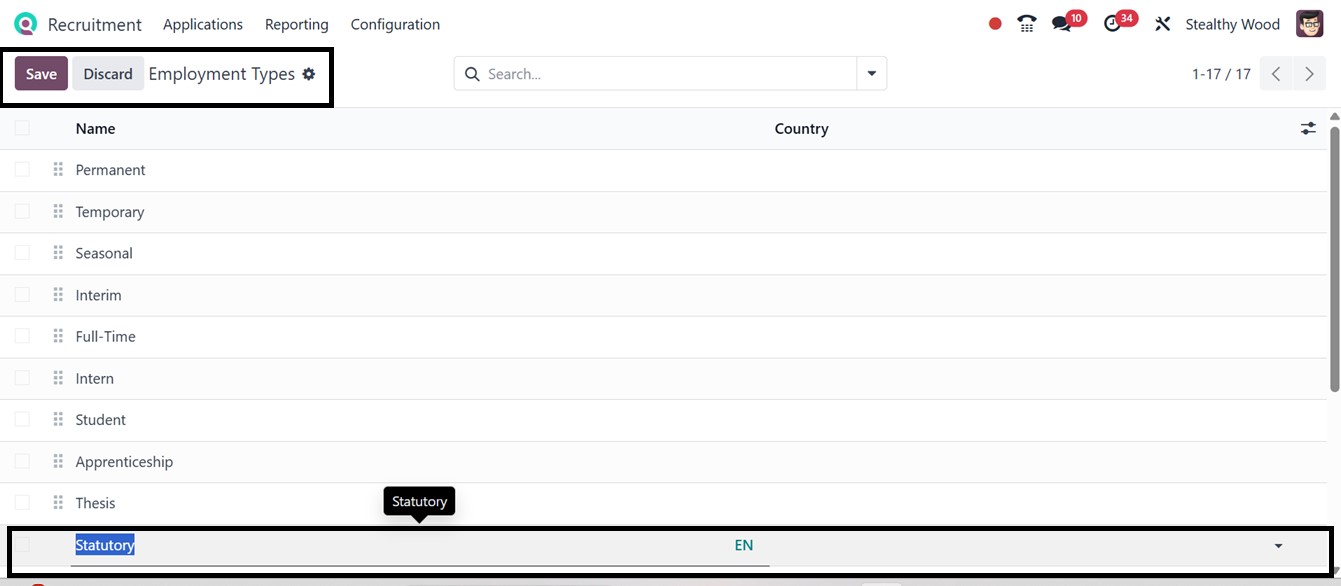
Organizations may offer various forms of employment, such as full-time, part-time, or
temporary roles. The Employment Types section under the Job Positions category allows
users to manage these categories. Pre-configured Employment types are displayed in this
section in a list format. To add a new type, simply click on the New button and enter
the name of the new employment type as demonstrated in the example screenshot given
below.
2.3 Degrees
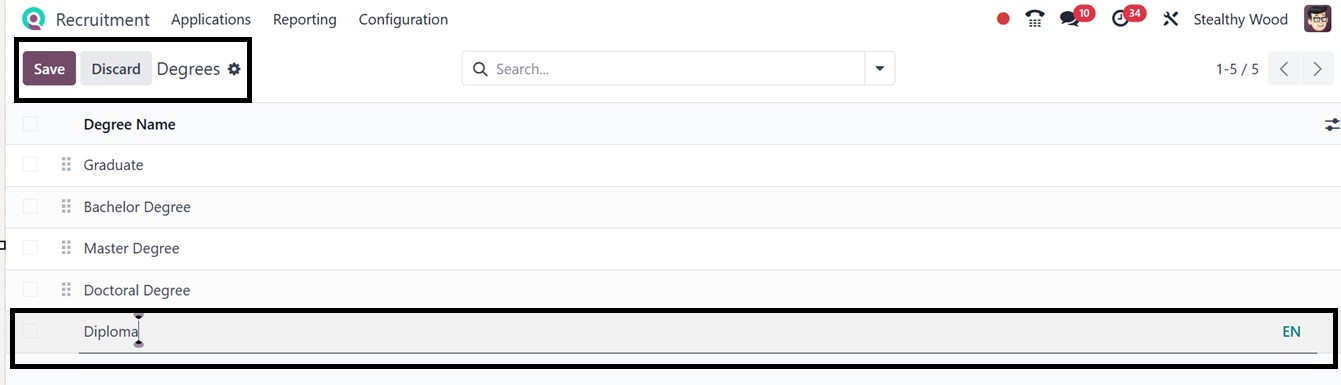
Recruiters often require educational qualifications from applicants. The ‘Degrees’
configuration option allows users to manage different levels of education. To add a new
degree, click on the New button, fill in the relevant ‘Degree Name’ in the new field,
and save the data, as depicted in the screenshot below.
2.4 Refuse Reasons
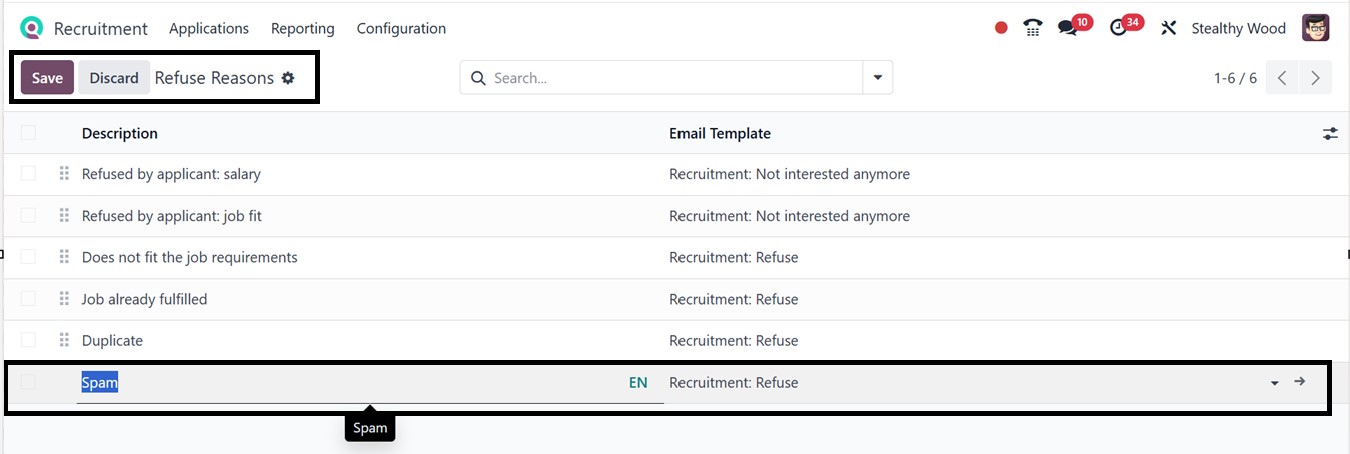
When an applicant is not selected for a job post, it’s important to provide a reason for
the refusal. The Refuse Reasons configuration allows users to define and manage such
reasons. This section includes customizable templates, email descriptions, and a
predefined list of refusal reasons. New reasons can be added by clicking the New button
and mentioning the refusal Description and an Email Template to help maintain a
consistent and professional communication style, as illustrated in the screenshot below.
2.5 Offer Refuse Reasons
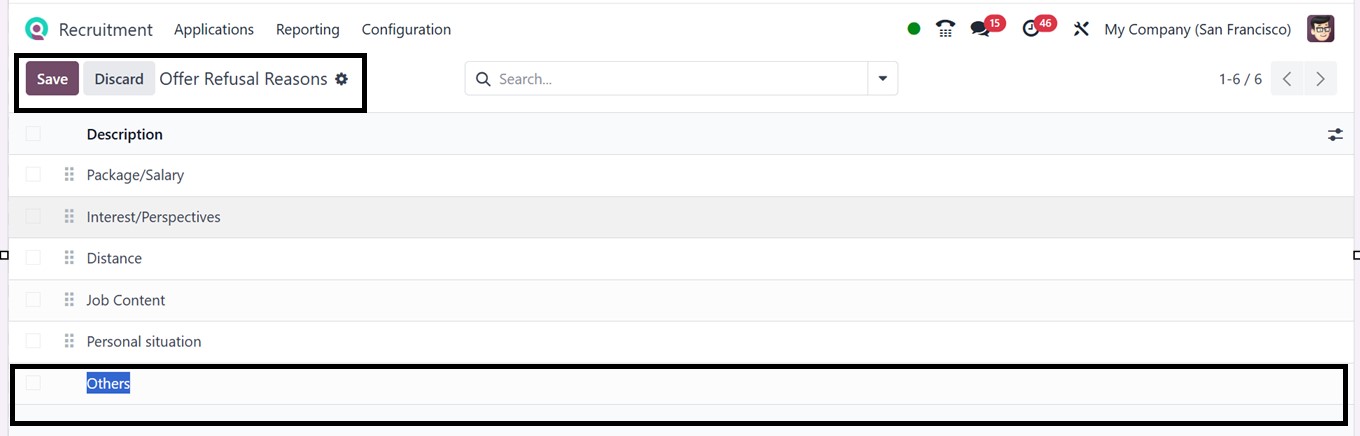
The “Offer Refuse Reasons’ accessed via the ‘Configurations’ menu feature helps track and
categorize the reasons why candidates decline job offers. It allows recruiters to choose
from predefined or custom reasons, such as salary concerns or competing offers, making
it easier to analyze trends and improve hiring strategies. This data supports better
reporting, helps refine offer terms, and provides HR teams with insights to enhance the
overall recruitment process
From the available reasons, you can add customized reasons using the ‘New’ button and
just edit the reason in the ‘Description’ area, as illustrated below.
2.6 Tags
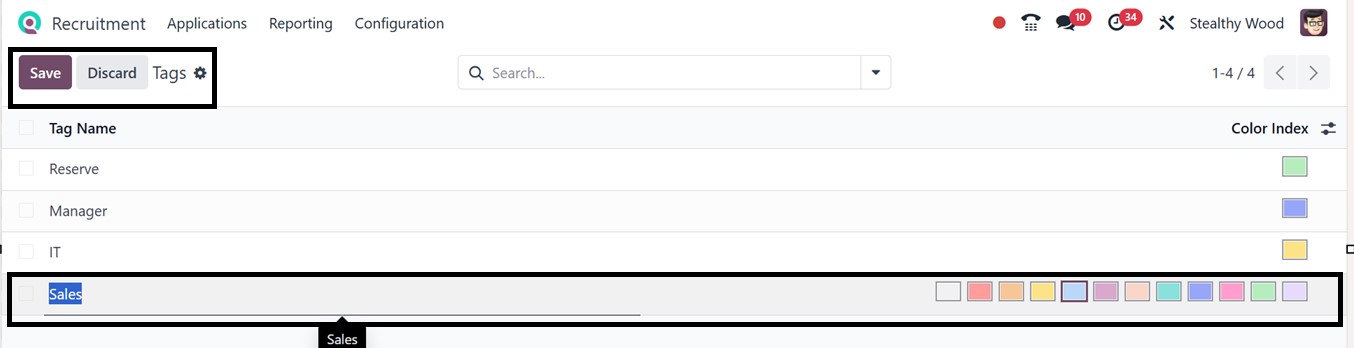
Tags are useful for organizing and filtering recruitment-related data. The Tags section
helps in classifying candidate profiles, job postings, and application records. Click on
the New button to add a tag. You can assign a new ‘Tag Name’ and select a ‘Color Index’
for quick identification and highlight specific records, as illustrated in the
screenshot below.
2.7 Departments
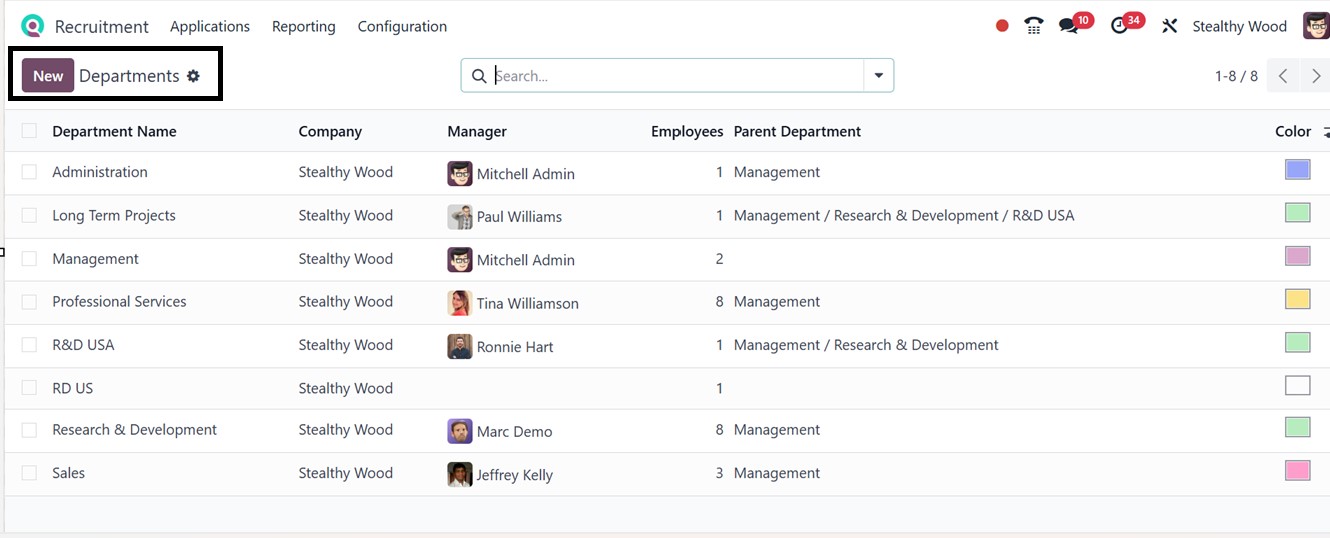
The Departments section enables users to manage company departments. Fields include the
Department Name, Manager, Parent Department, Company, and assigned Employees, as
depicted in the screenshot below.
Click on the New icon to create a department and enter all required data including the
Department Name, Manager, Parent Department, Company, Color, Appraisal Templates and
Appraisal Survey to set a default survey template related to this particular department,
as shown below. Once completed, save the new department using the ‘Save’ icon.
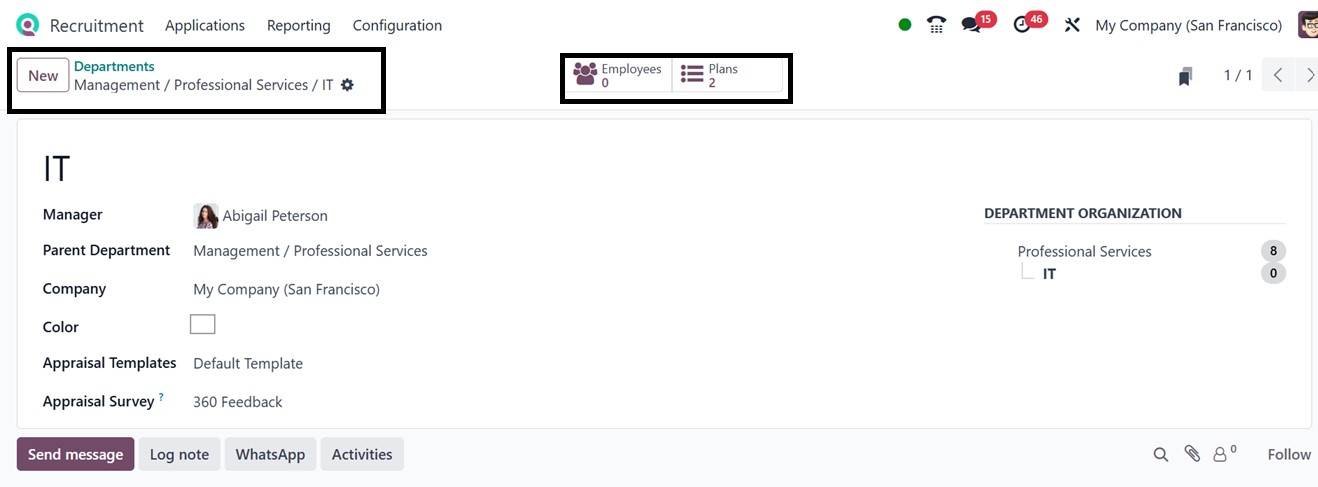
After saving the data, you can see the smart buttons, such as Employees and Plans, to
manage staff details and internal plans including Employee Onboarding and Offboarding
plans.
- Onboarding Plan: When a new employee joins for a job position, the onboarding
assists management, IT, and HR in adhering to a planned process. It involves things
like configuring work equipment, establishing user accounts, disseminating corporate
regulations, and scheduling orientations or training. For new hires, these
predetermined processes guarantee a seamless start.
- Offboarding Plan: By collecting company assets, cutting system access,
conducting exit interviews, and completing paperwork, offboarding oversees the
employee departure process. This guarantees a seamless and expert transfer.
The 'Plan' smart button lets you manage job-specific Onboarding and Offboarding plans for
this particular department streamlining hiring and resigning processes with predefined
tasks. It automates task assignment by role or department, ensuring nothing is missed
and providing a smooth, organized experience for new hires and departing employees.
The Action menu at the top allows users to Delete, Duplicate, or Archive the form. The
‘Request Signature’ button can be used to request a signature in any recruitment form or
departmental documents.
A notable feature is the Skill History Report, which provides in-depth insights into
candidates’ skills, qualifications, and career history. Clicking this button opens a
report window showing relevant employee data for the selected department.
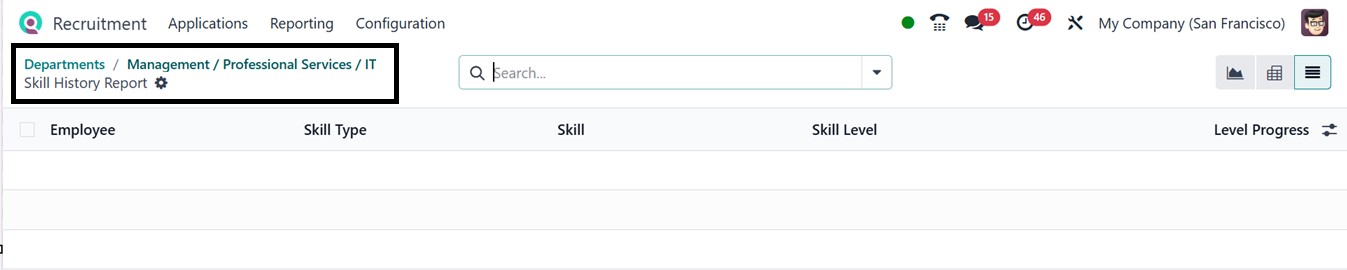
In the Skill History Report window, use filtering and grouping tools from the search bar
for tailored analysis. The data view can be toggled between Graphical, List and Pivot
view modes.
2.8 Skill Types
Specific skill sets are vital during candidate evaluation. The Skill Types section allows
users to define and manage categories like language skills, technical competencies, and
professional expertise.
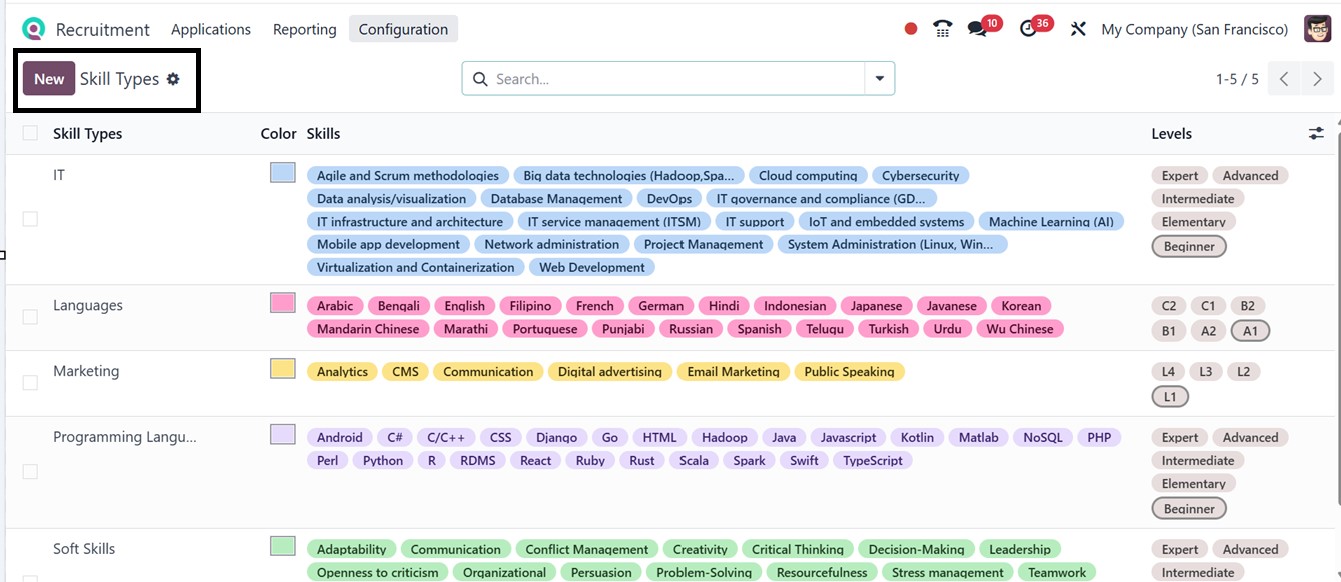
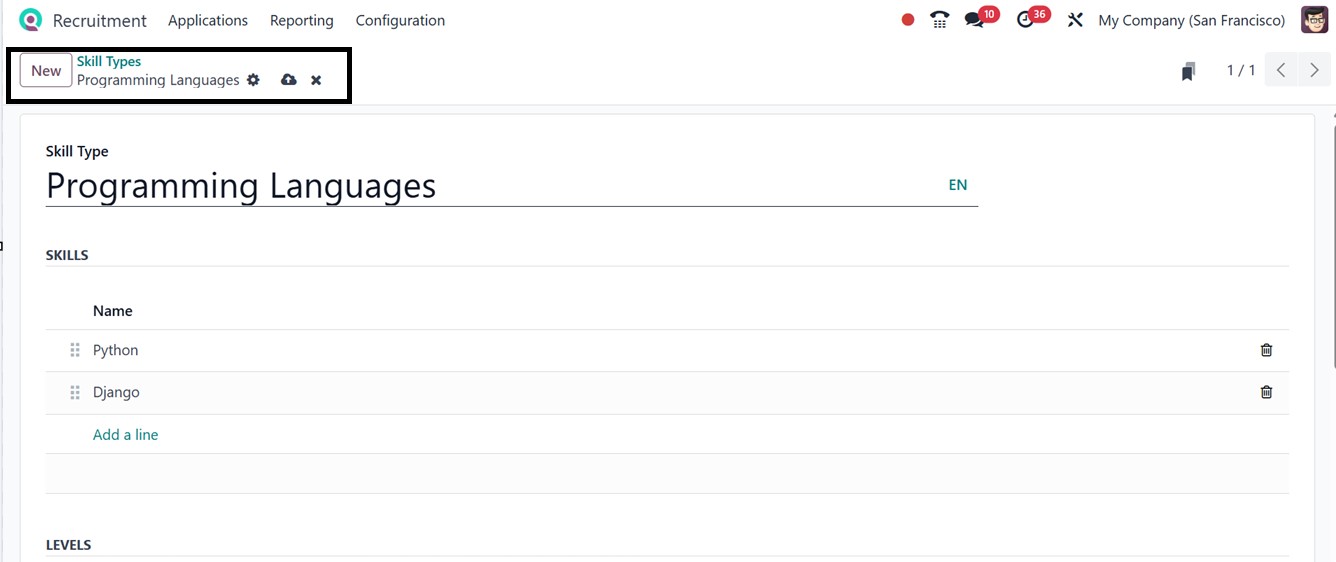
To add a new skill type, click the New button, name the Skill Type, and then add relevant
skills in the ‘SKILLS’ area using the ‘Add a line’ button, as depicted in the screenshot
below.
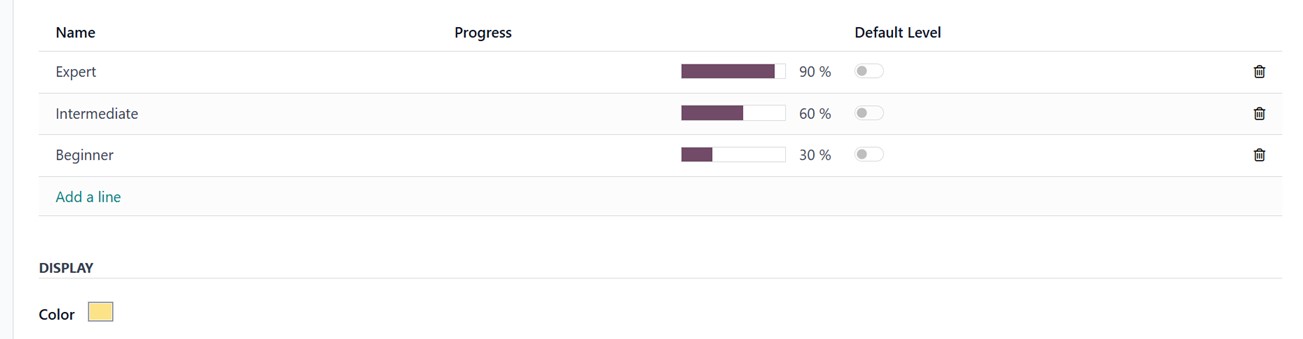
In the LEVELS section, you can define various skill levels, such as Beginner,
Intermediate, or Expert, based on your needs. The Progress area allows you to
specify the proficiency percentage for each level and set a default level using
the toggle switch. Additionally, the Color option lets you assign a specific
color to each skill level, making it easier to visually highlight in a job post
window or the website interfaces.
2.9 Contract Templates
The ‘Contract Templates’ in Odoo 18 Recruitment Module help to ease and
standardize the process of creating employee contracts when a candidate has been
hired. These templates define standard contract parameters such as compensation
structure, working hours, job position, and perks, allowing them to be reused in
other positions or departments. This maintains uniformity, reduces manual input,
and speeds up onboarding.
The ‘Contract Templates’ dashboard will list all the available templates with
their Contract Reference, Department, Job Position, Start and End Dates,
Contract Type, Yearly Cost, Working Schedule, and Status, as illustrated in the
screenshot below.

To configure new contract templates, click on the ‘New’ button from the
dashboard. But first, verify that the Employees module, which manages
contracts, is installed. To define a new template, edit the template name in
the relevant area.
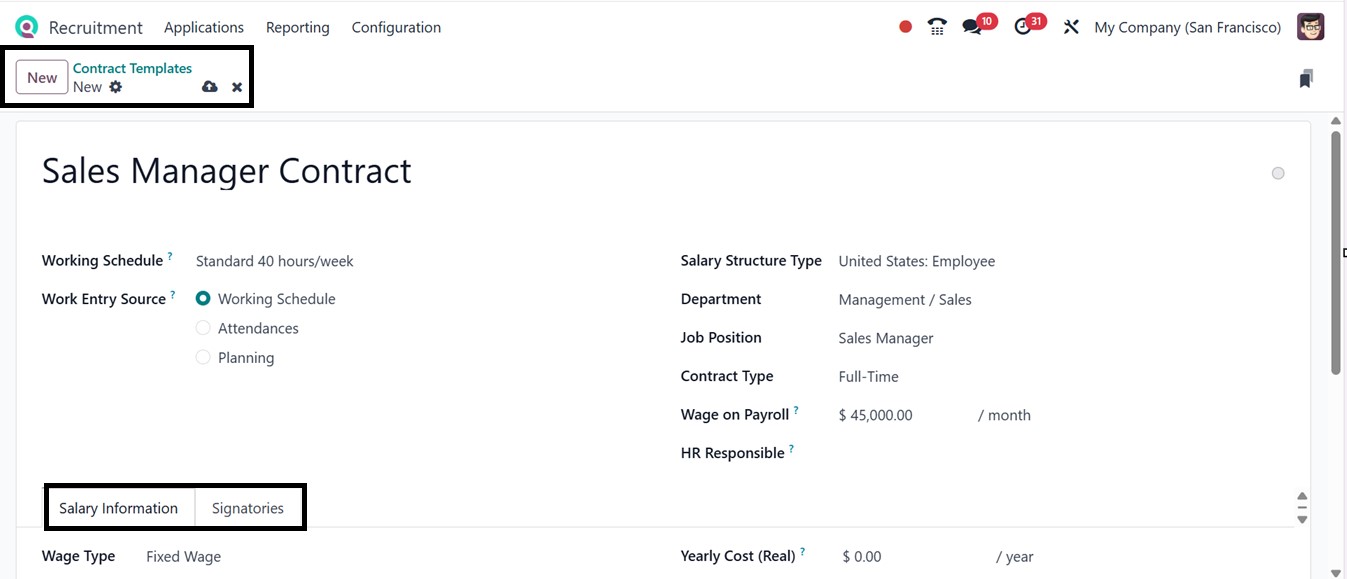
The ‘Working Schedule’ defines expected working hours, while the ‘Salary
Structure Type’ is used to calculate payroll, and the Job Positions and
departments can be assigned to tailor contracts to specific roles or
teams. The ‘Work Entry Source’ option defines the source for work entry
generation. Then, mention the Department, Job Position, and Contract
Type options. By setting the Wages on Payroll amount, employees can get
an overview of their payroll. Finally, mention the responsible person
for validating this contract in the ‘HR Responsible’ field.
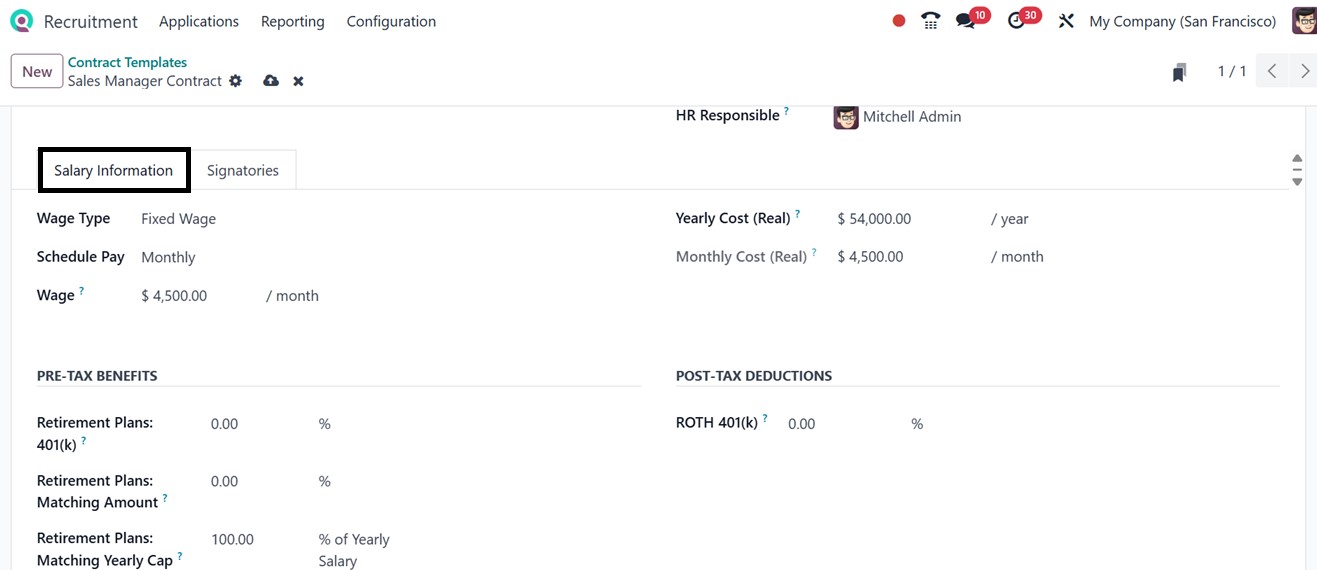
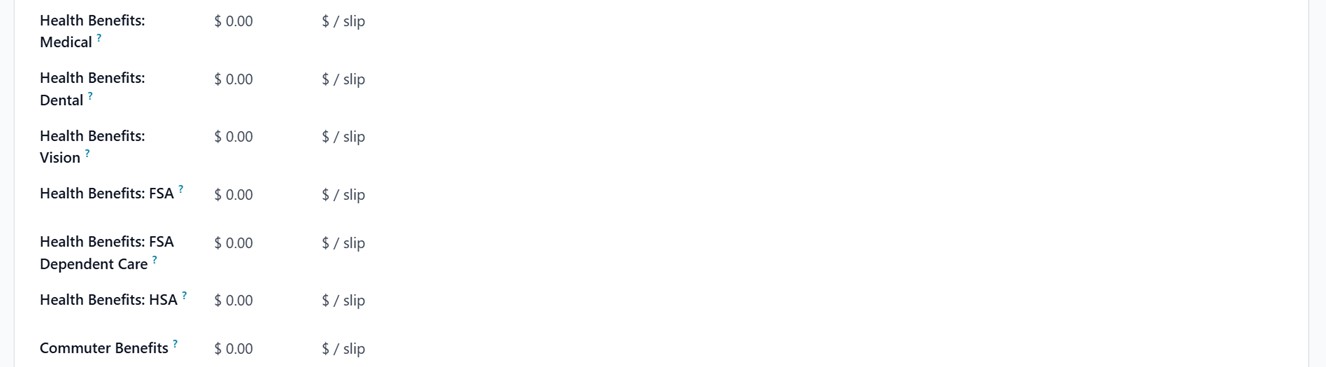
In the ‘Salary Information’ tab, you can specify the Wage Type, Schedule
Pay, Wage, Yearly Cost, Monthly Cost, PRE-TAX BENEFITS, and POST-TAX
DEDUCTIONS, as illustrated in the screenshot below.
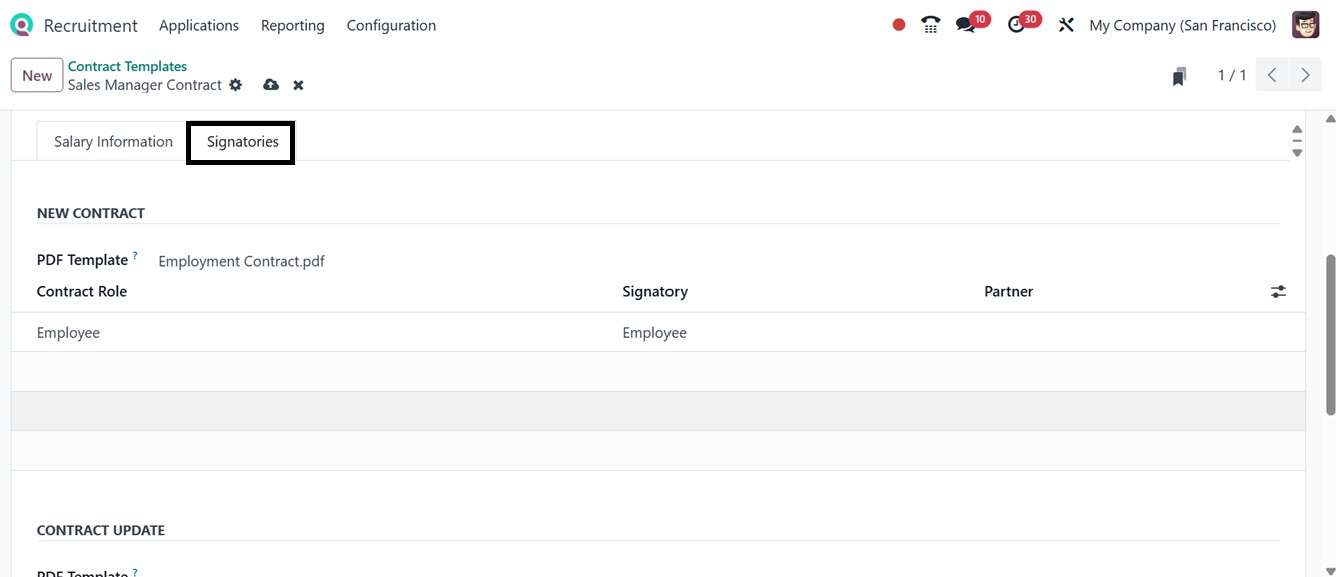
The ‘Signatories’ tab allows you to upload ‘PDF Templates’ for
employee contract documents, one in the New Contract section for
signing upon joining, and another in the ‘UPDATE CONTRACT’
section for signing during contract updates.
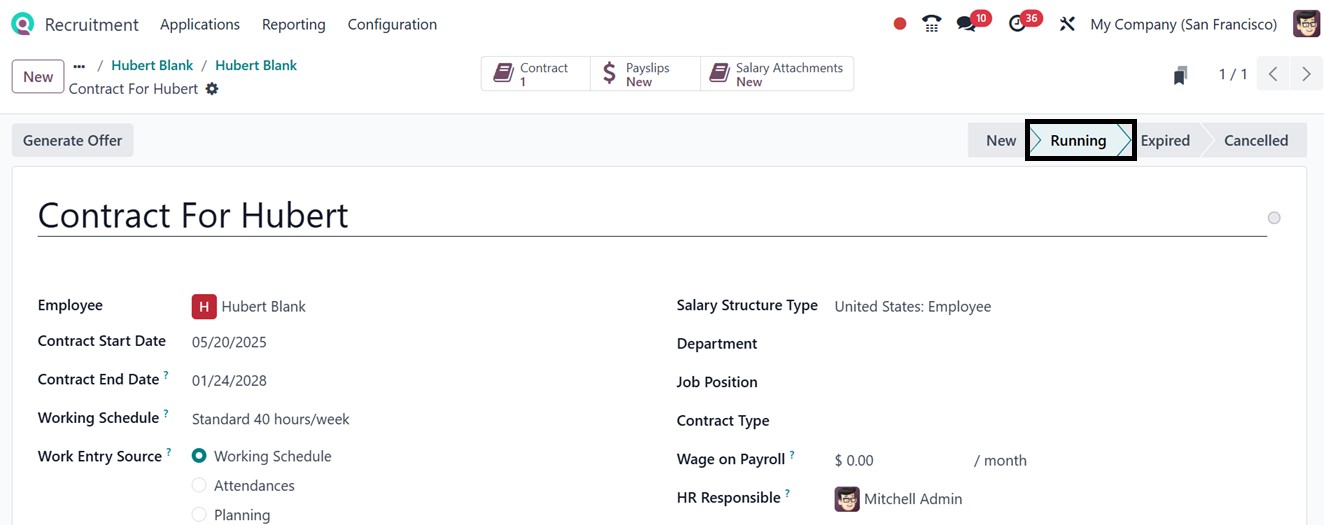
After saving the data, these templates can be used during the
recruitment process, and when a candidate reaches the Hired
stage, you can utilize the ‘Create Employee’ button to
change the applicant into an employee. Then, we must draft
an employment contract for a candidate after employing them
using the ‘Contracts’ smart button with important
information such as the job title, pay, working hours, and
validity of the contract, etc. The contract status has to be
adjusted to "Running" in order to activate the employee in
the system, as shown in the screenshot below.
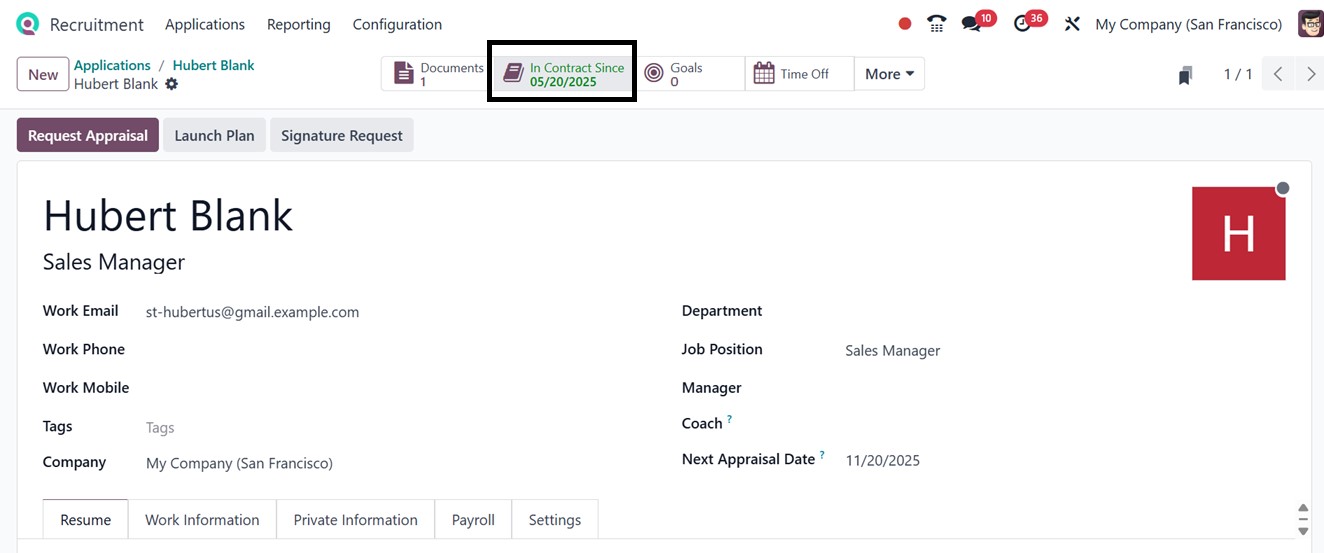
Then, you can click on the ‘Generate Offer’ button to
proceed. So, this employee will subsequently be
considered active and qualified for departmental
assignments, payroll, and other HR procedures. The
visual indication of an active ’In Contract Since’ smart
button in green color signifies that the person has been
formally onboarded and their job contract is running, as
depicted in the screenshot below
2.10 Activity Types
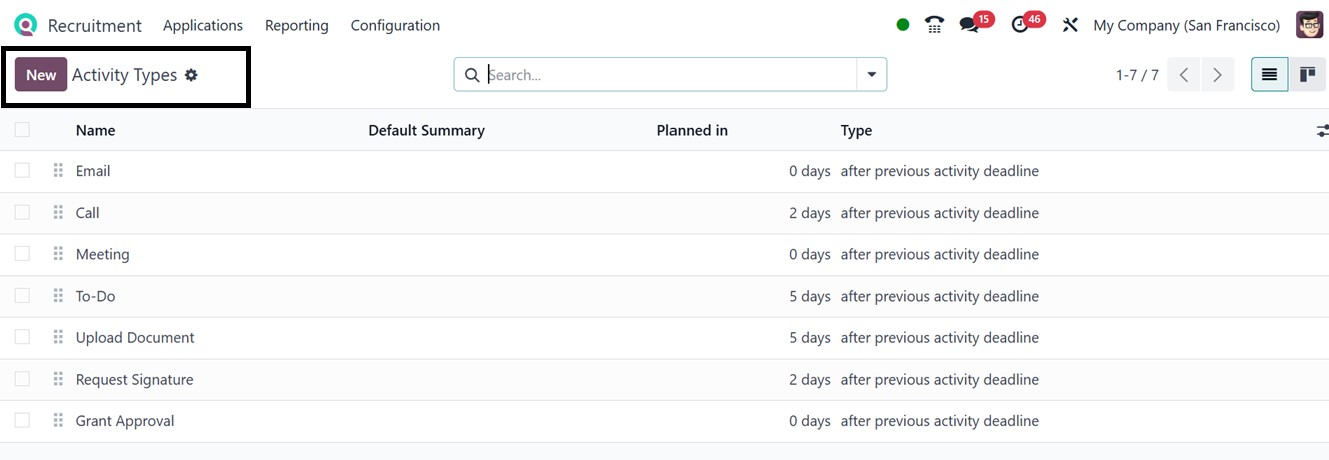
The Activity Types help track and manage
recruitment-related actions such as interviews,
feedback collection, and applicant follow-ups.
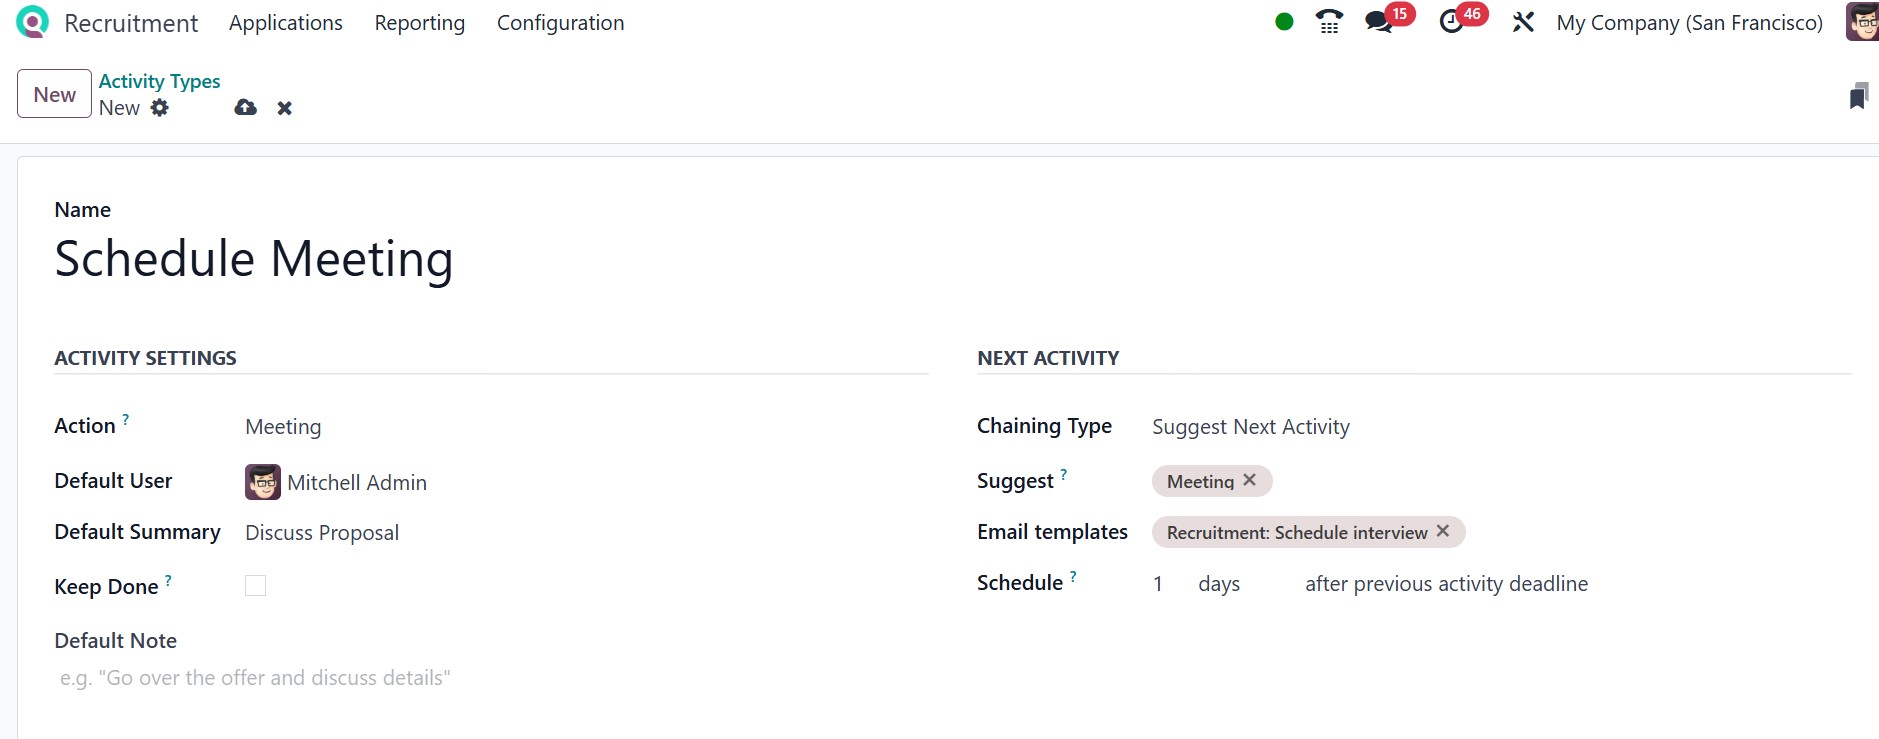
To create a new activity type, click the New icon
and fill in attributes such as Activity Name,
Actions, Default User, Default Summary, Default
Note, and Keep Done. You can also choose the
Chaining Type, Suggest, Use built-in Email
templates and Scheduling period for scheduling
that activity after the previous activity
deadline. Once all information is added, click
Save to finalize the activity type, as depicted
in the screenshot below.
2.11
Activity Plans
Activity Plans in Odoo are structured task
flows designed to guide users through
repetitive workflows such as onboarding or
project milestones. The Activity Plans menu
displays all preconfigured recruitment task
flows.

To create a new plan, click New, and
enter details like Plan Name, Model,
Company, and Department. Under the
Activities To Create tab, define the
sequence of activities necessary to
complete the process using the ‘Add a
line’ button.
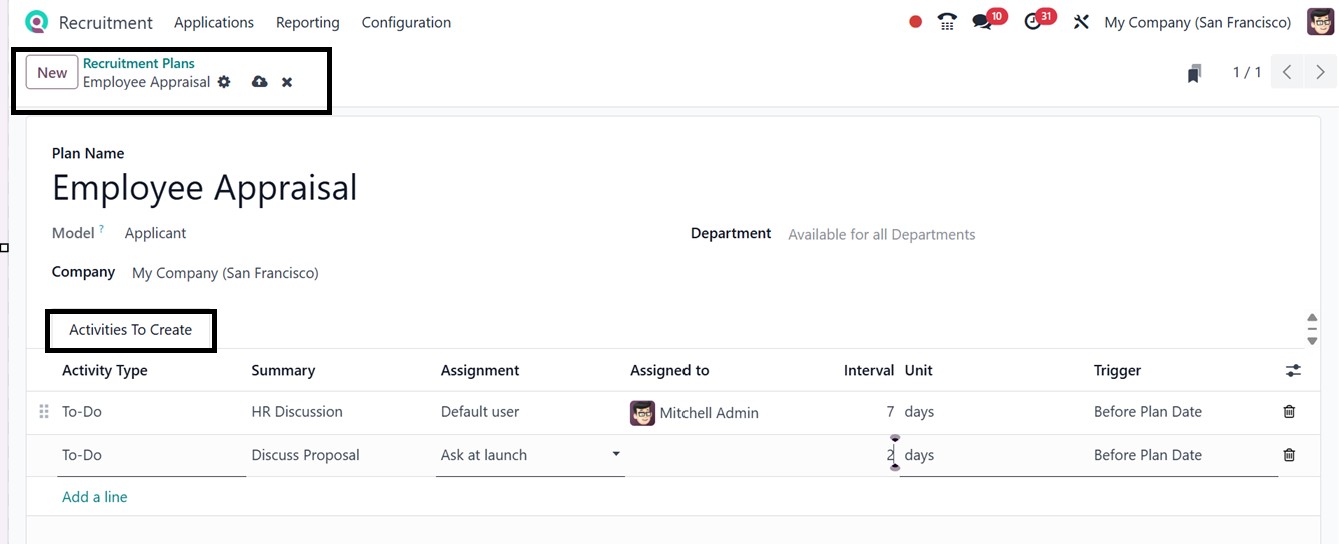
You have to mention the Activity
Type, Summary, Assignment, Assigned
Person, Interval Unit, and Trigger
options to create the new activity
plan. After setting up the
activities, click Save. These plans
enhance process consistency and
ensure critical steps are not
missed.
2.12 Emails
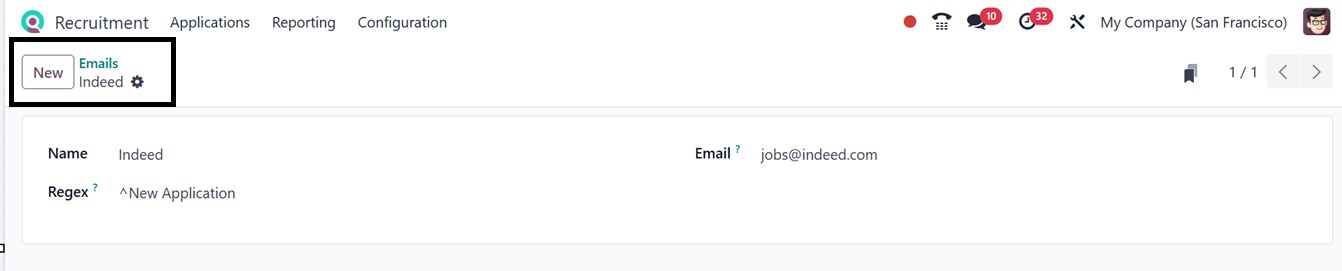
The Emails section manages email
addresses used across different
recruitment channels. This view
shows email addresses alongside
their associated Regex patterns for
validation.
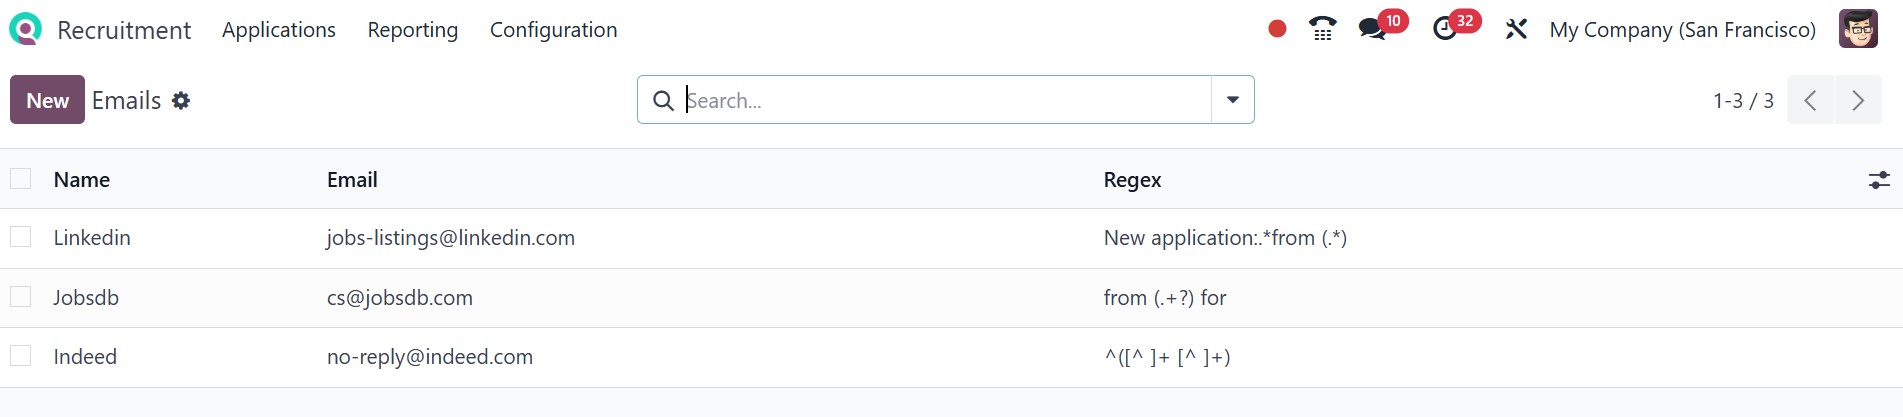
To add a new email, click the New
button and complete the required
fields as shown in the provided
screenshot.
2.13 Interviews
The Interviews menu in Odoo
18 facilitates the
scheduling, monitoring, and
management of job
interviews. From the
Configuration > Interviews
section, you can view all
interview templates with
their Recruitment Form,
Questions, Average Duration,
Registered, and Completed
status.
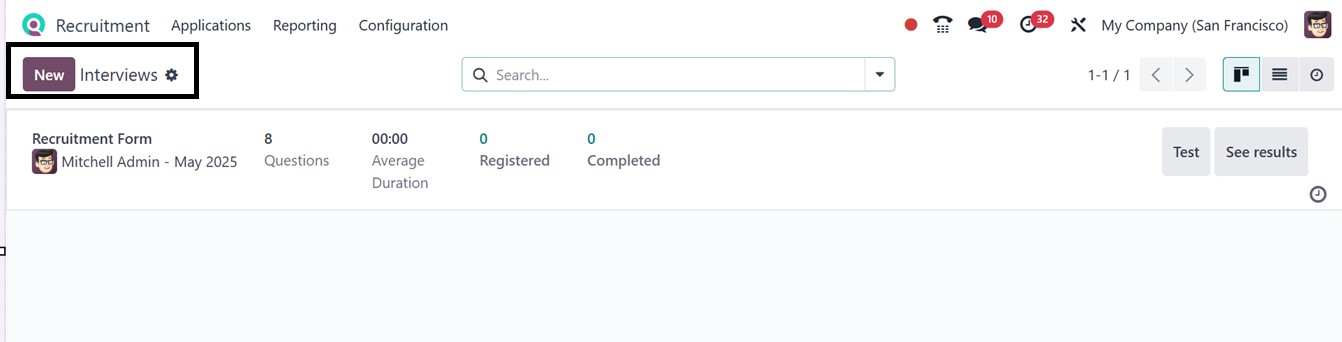
Users can initiate the
test or view results via
the Test and See results
buttons. To create a new
interview form, click
New, then specify the
Interview Name,
Responsible, and
Restricted To fields.
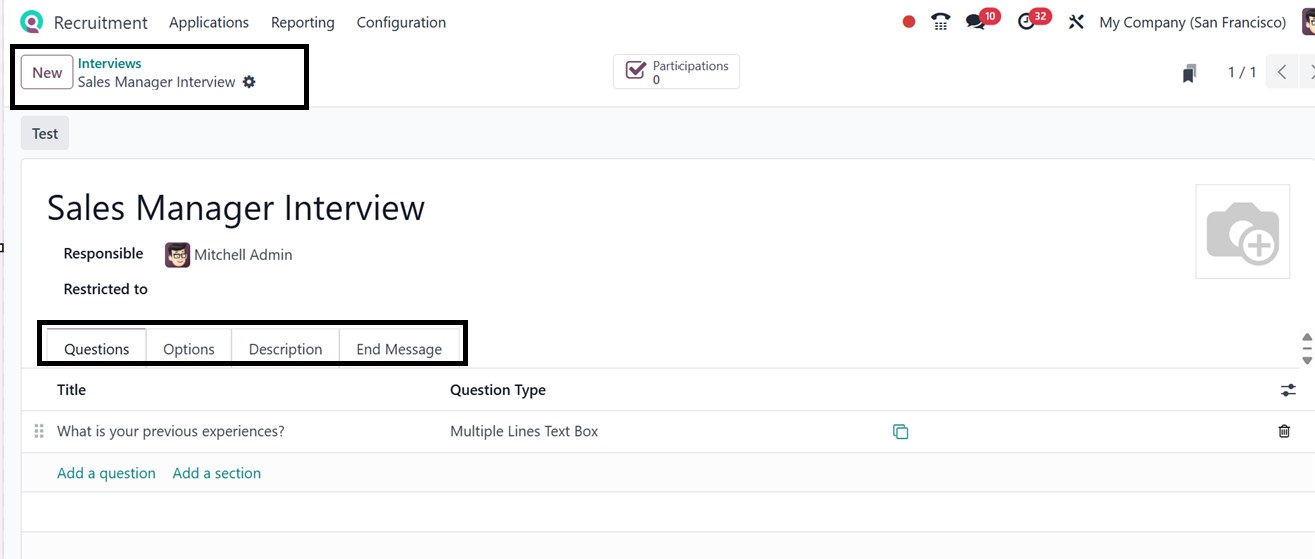
Under the Questions
tab, you can
structure interview
questions by adding
sections and
descriptions. Use
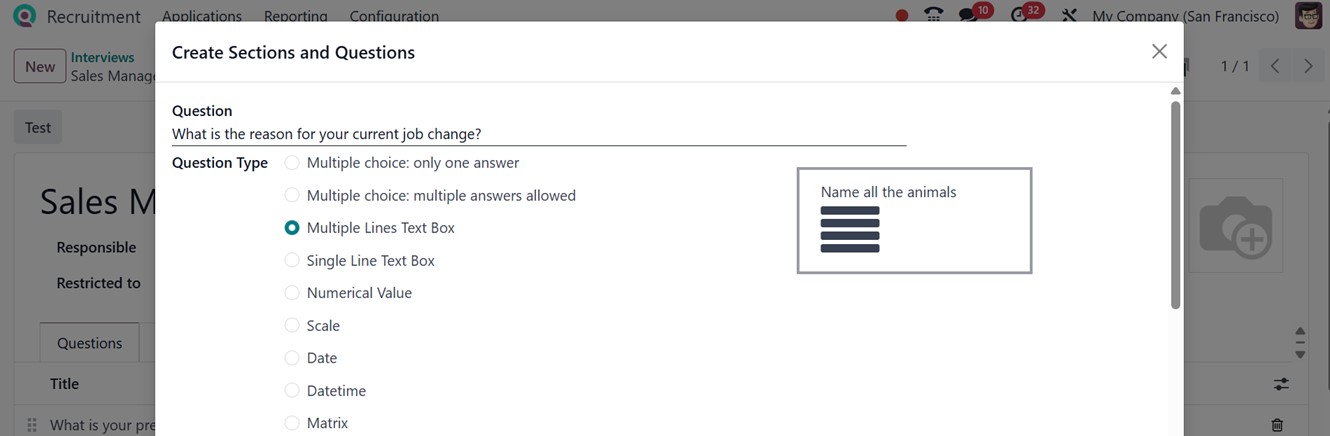
the Add a Question
button to open a new
pop-up for question
entry. Choose the
question format from
types like Multiple
Lines, Text Box,
Single Line, Date,
Datetime, Numerical,
or Matrix. The
default type is
Single Line Text
Box.
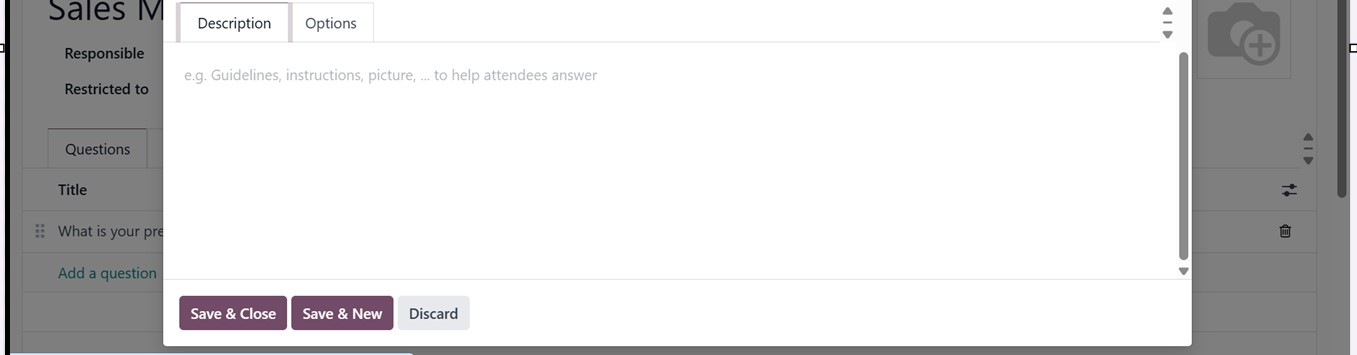
In the
Description
tab, explain
the purpose
of the
question.
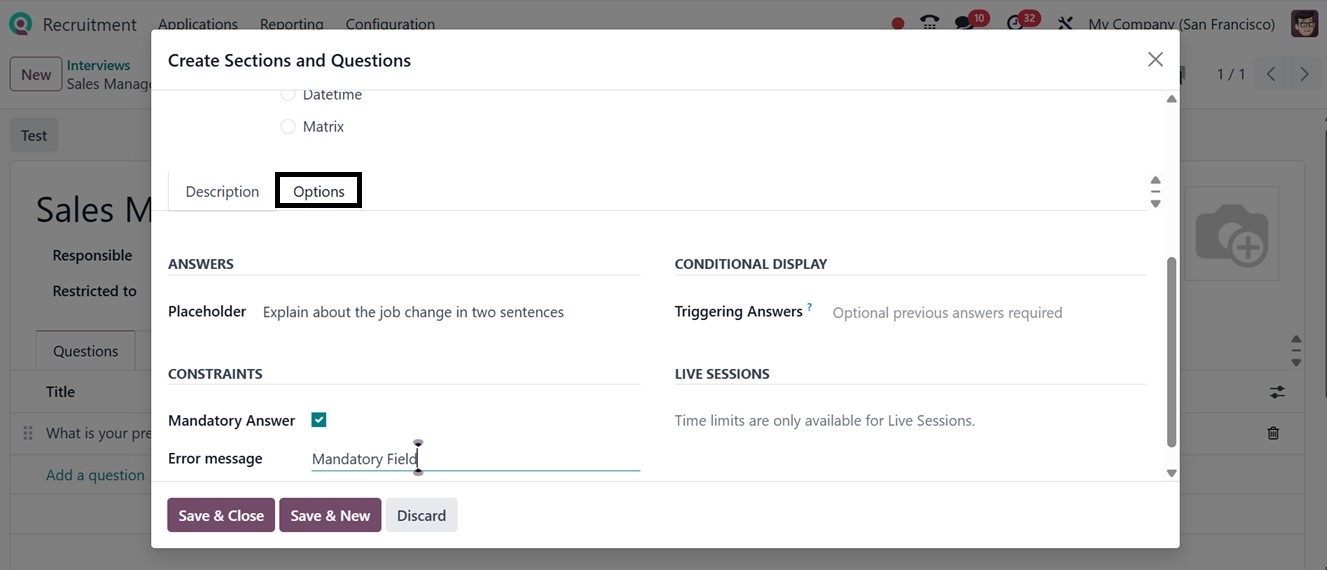
The Options
tab allows
customization
like setting
Placeholders,
Triggering
Answers,
Defining
Error
Messages,
and marking
questions as
Mandatory.
After
saving
individual
questions,
continue
building
the
interview
template.
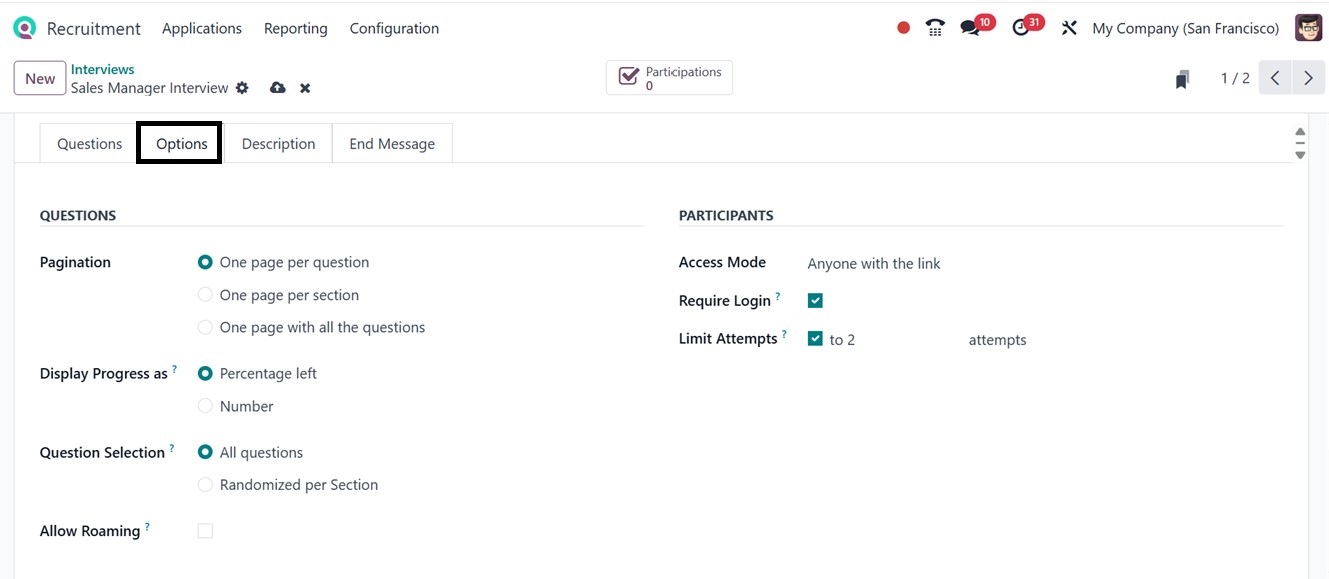
In the
Options
tab of
the main
form,
you can
set
options
such as
Pagination,
Display
Progress,
Allow
Roaming,
Access
Mode,
Require
Login,
and
Limit
Attempts.
Use
the
Description
tab
to
give
an
overview
of
the
interview
purpose,
and
the
End
Message
tab
to
add
a
final
note
for
candidates
after
submission.
Once
the
form
is
configured,
save
it
and
test
the
interview
by
clicking
the
Test
icon.
This
opens
a
web
version
of
the
interview.
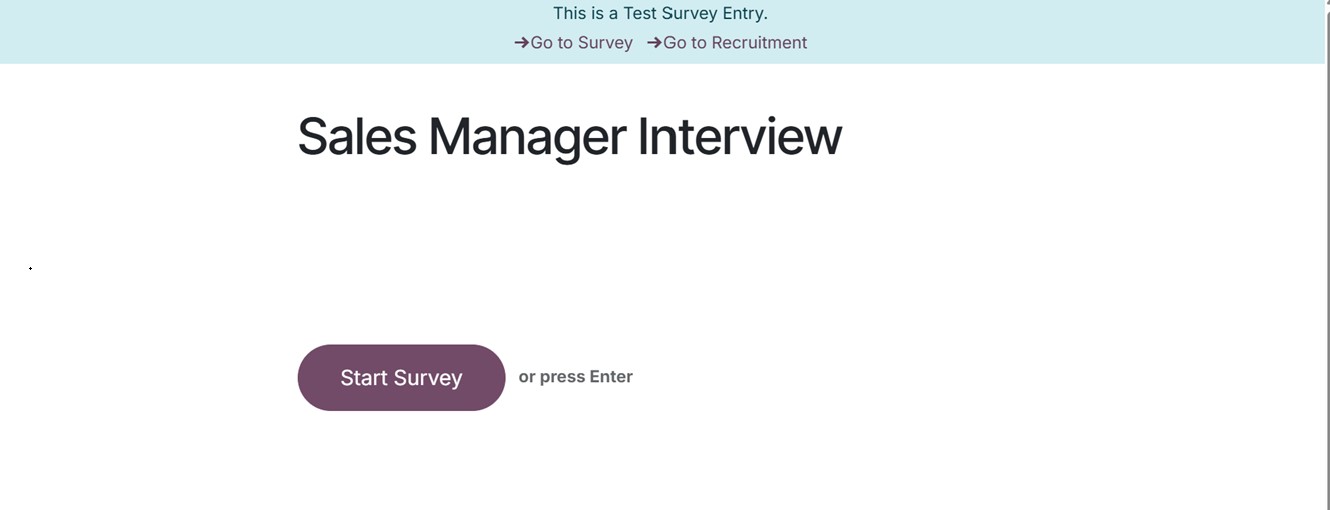
Candidates
can
begin
the
process
by
clicking
the
Start
Survey
button.
This
will
lead
you
to
the
website
interface,
as
depicted
in
the
screenshot
below.
Then,
answer
the
questions
one
by
one
using
the
Continue
button.
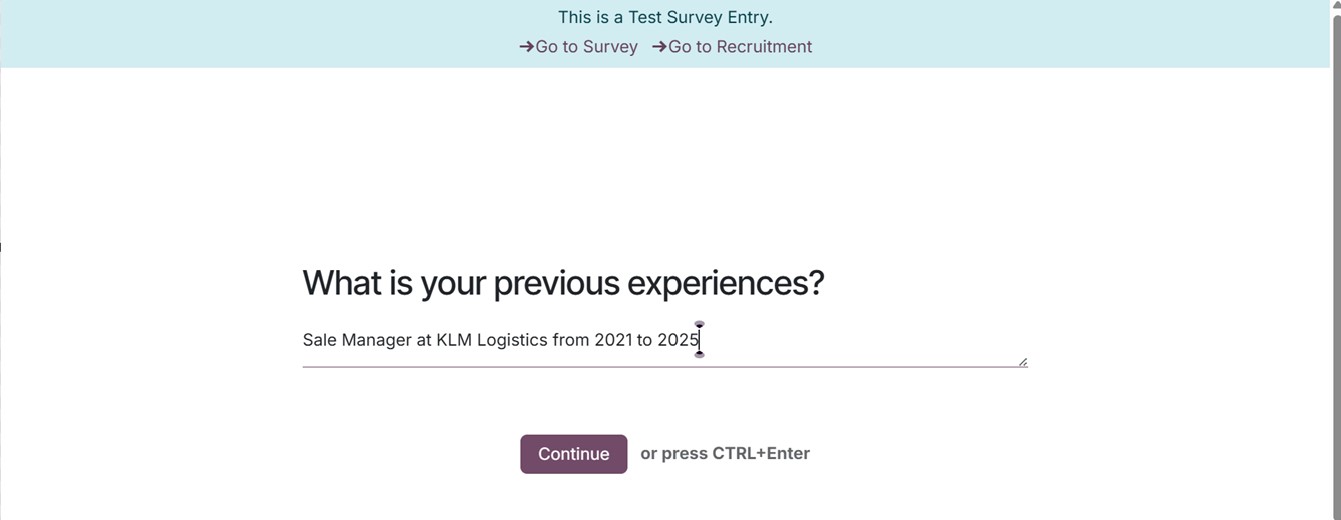
Finally,submit
the
survey
using
the
Submit
button,
as
illustrated
in
the
screenshot
below.
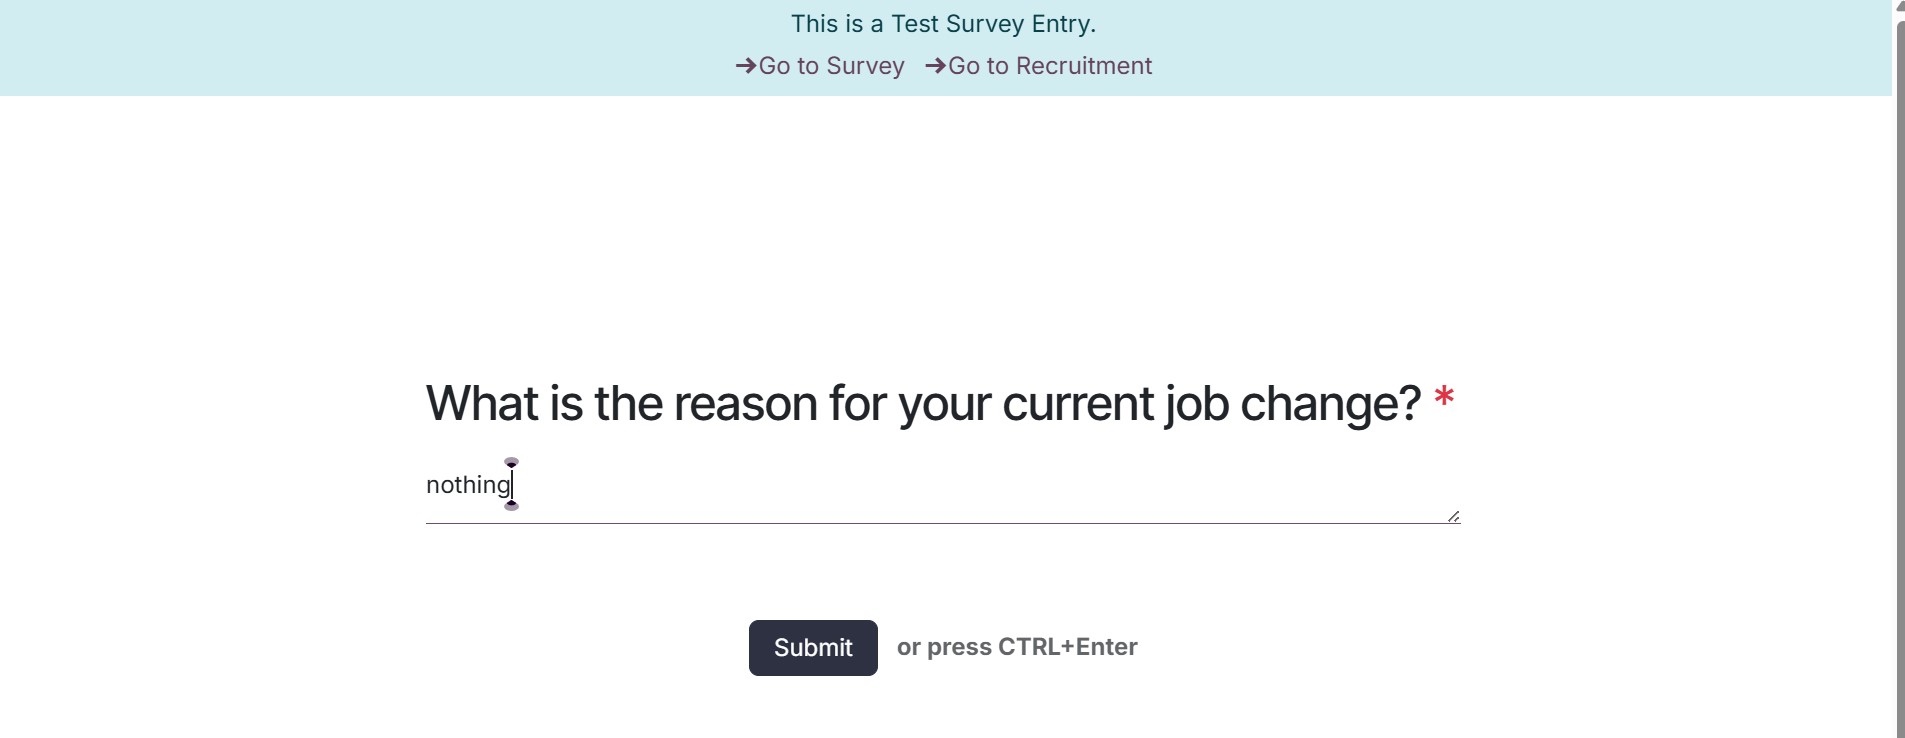
Based
on
the
configured
settings,
candidates
can
retry
the
interview
and
view
submitted
answers
using
the
‘Take
Again’
or
‘Review
your
answer’
buttons.
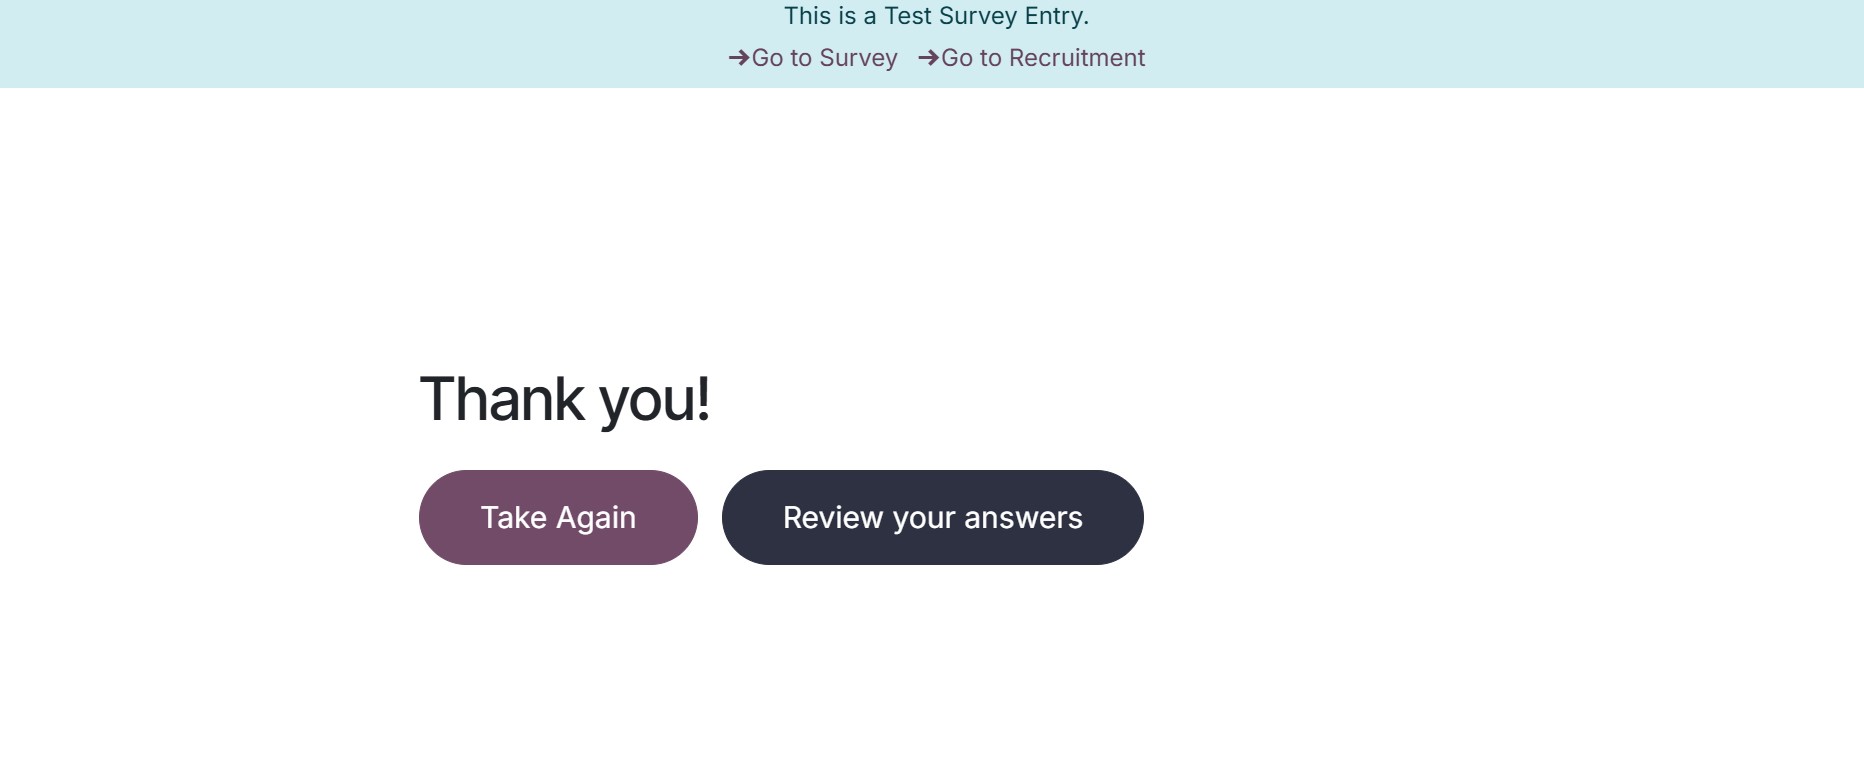
After
submission,
you
can
monitor
participant
data
via
the
Participants
smart
button.
The
Interview
feature
supports
calendar
sync,
feedback
collection,
and
result
reporting,
which
helps
recruiters
track
and
improve
their
hiring
process.
It
also
contributes
to
key
performance
metrics
like
time-to-hire
and
conversion
rates.
The
interface
ensures
a
collaborative
and
efficient
recruitment
experience
with
centralized
control
and
insightful
evaluations.